AutoSSL
AutoSSL is the solution to one of the biggest headaches that exists for every cPanel & WHM user: SSL installation and renewal. AutoSSL installs FREE signed SSL certificates that are automatically generated and installed on the server. There is no need for you to generate a certificate signing request (CSR), pay a Certificate Authority (CA) for each certificate, or renew certificates when they expire. cPanel takes care of everything for you.
If your website is on a shared server, AutoSSL is already enabled. If your existing SSL certificate is expiring in the next week, a new SSL certificate will automatically be provisioned and installed. If you have never had an SSL certificate installed before, there should be one installed now.
If you are on a Cloud or Dedicated server, you may need to check that AutoSSL is enabled.
How to Enable AutoSSL
By default, only cPanel is listed as a SSL provider. There is a plugin available for Let's Encrypt. It can be installed by logging into SSH on your cPanel server as root, and running the following command:
<syntaxhighlight lang="bash">/scripts/install_lets_encrypt_autossl_provider</syntaxhighlight>
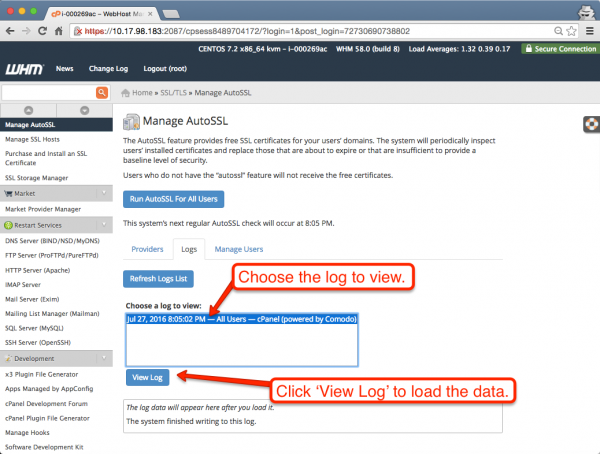
In WHM, navigate to SSL/TLS -> Manage AutoSSL. Select a SSL Provider, check mark any additional checkboxes offered, and click Save.
Once saved, click the "Run AutoSSL for All Users" button. This will start the initial cronjob run to identify domains resolving to the server that do not have an SSL (or have an expired SSL Certificate), or have a valid certificate about to expire. The cronjob will generate and install the SSL certificate for all valid domains.
How to Troubleshoot AutoSSL
If you have any problem with the application, you can view the logs for AutoSSL right from the WHM interface. After the first run of the cronjob you’ll see the logs listed in the ‘Logs’ tab. You can load the log by selecting the log file you’d like to view and clicking ‘View Log’.

