How to cancel your hosting service
1. Log into your Client Area
Lost your billing account password? Click on the following link to reset it:
2. Click 'Services' on the menu bar and then click 'My Services'.

3. Click on 'Active' on the Product/Service you are wanting to cancel.

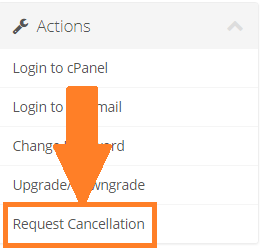
4. Click on 'Request Cancellation' under 'Actions' to the left.

5. Briefly describe your reason for Cancellation and then click the 'Request Cancellation' button.
Please note that hosting services will remain active until the end of the term in which the cancellation request is submitted.
A few extra steps you should consider...
6. Confirm cancellation
The system will send you a confirmation email. You can also confirm the cancellation was successful by clicking on the arrow icon next to "Hello, NAME!", and click on "Email History". All emails Acenet sends you are logged there.
7. Cancel other hosting services
Each hosting service must be cancelled separately. If you do not want other hosting services to renew, you must repeat the above process for each hosting service you wish to cancel.
8. Disable domain registration auto renewal
If you do not want a domain registration to renew, you must take a different action. The following article shows you how to disable auto renewal for a domain registration:
How to cancel your domain registration
Domain registrations are billed separately and auto renewal must be disabled to cancel them.
