PHP Configuration - php.ini
Acenet uses CloudLinux with PHP Selector to allow you to select from several different versions of PHP. This is useful if you want to run a PHP application requiring a different release of PHP than the default version on the server.
If you are on a cloud or dedicated server without PHP selector, the instructions can be found here
1) Log into your cPanel as normal.
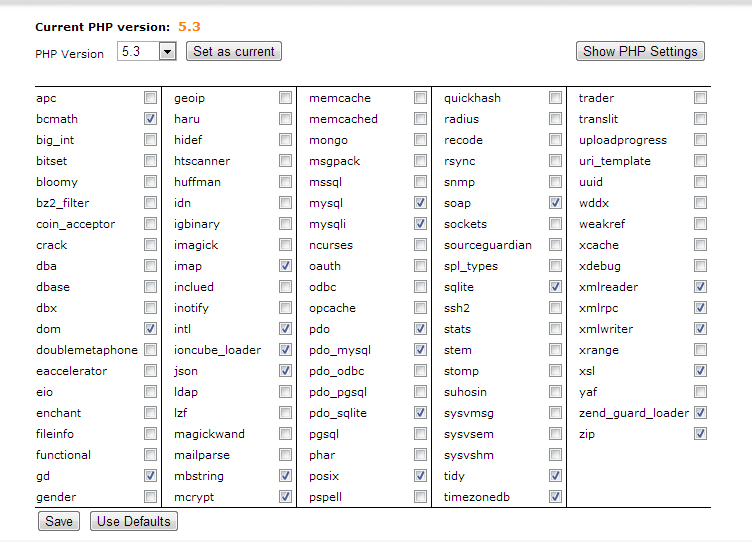
2) Scroll down to the "Software/Services" section and click on "Select PHP Version".
3) Choose the php version you need from the "PHP version" dropdown menu.
4) A list of available php extensions for that version of PHP will appear underneath. The most commonly needed modules will already be selected, but if you have specific modules that you know your software needs, you can enable them as well by selecting their checkboxes and clicking on the "SAVE" button underneath.
5) Once your php version is selected and any changes to the selected modules are saved, click on the "Set as current" button next to the PHP version dropdown menu.
Changing your php.ini settings
1) Log into your cPanel as normal.
2) Scroll down to the "Software/Services" section and click on "Select PHP Version".
3) If the "PHP Version" is set to Native, Choose the php version you need from the "PHP version" dropdown menu and then click "Set as Current".
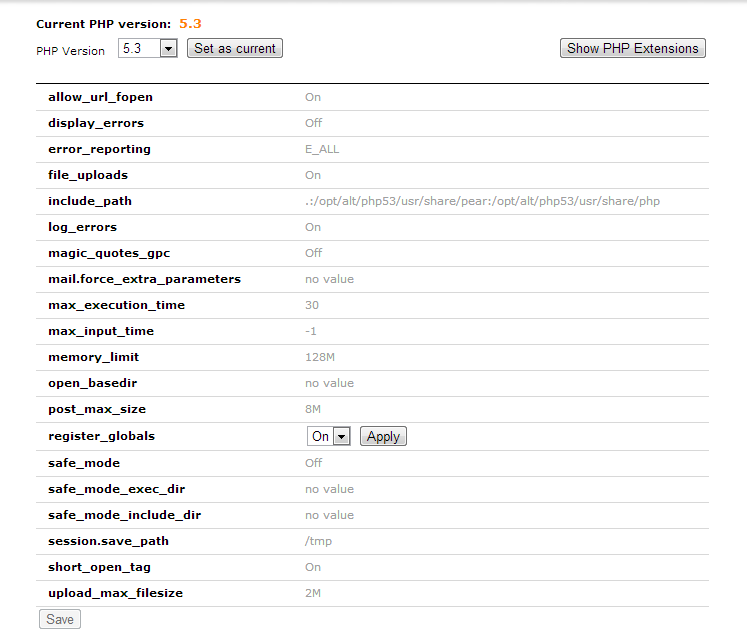
4) click on the Show PHP Settings button in the upper right of the selector screen.
5) This shows the most commonly edited account-wide PHP settings. Click on the grey value to the right, and you will either see a dialog field or a drop down box. Make the changes as needed, and then click apply. When done, click the save button at the bottom.
That's it! Your account is now set to use the version of php that you chose.
Cloud / Dedicated Servers
You can customize a php configuration using a php.ini file to modify php configurations for your script. You can change any of the PHP settings that are configured on the server by using a custom php.ini file. All you need to do is create a text document entitled php.ini in the needed directory.
Within this text document, specify the setting(s) you're wanting to change on separate lines. Here are some examples of PHP settings that you can change:
<syntaxhighlight lang="bash">register_globals = Off memory_limit = 64M</syntaxhighlight>
You will then need to set the permissions of the file to '755' and place it within the executing script's directory (the same directory that your script is located that requires this setting) because php.ini files are not recursive. If you're wanting to make your custom php.ini file recursive, in which it will affect all of your account's web accessible directories, you can view details on how to do so here:
How to make a php.ini file apply to all subdirectories
You can verify that the settings you specified have taken effect by creating a text document entitled:
phpinfo.php
with the following specified within it:
<syntaxhighlight lang="bash"><? phpinfo(); ?></syntaxhighlight>
You will then upload the 'phpinfo.php' file to the same directory you uploaded the 'php.ini' file to and view the 'phpinfo.php' file in your internet browser.

