Install R1Soft Agent: Difference between revisions
Docs admin (talk | contribs) Created page with "Requirements:<br> <br> a) Enough disk space is available on the Backup server you want to use for the agent server<br> b) The agent server is using a 64-bit OS<br> c) The agen..." |
Docs admin (talk | contribs) No edit summary |
||
| Line 45: | Line 45: | ||
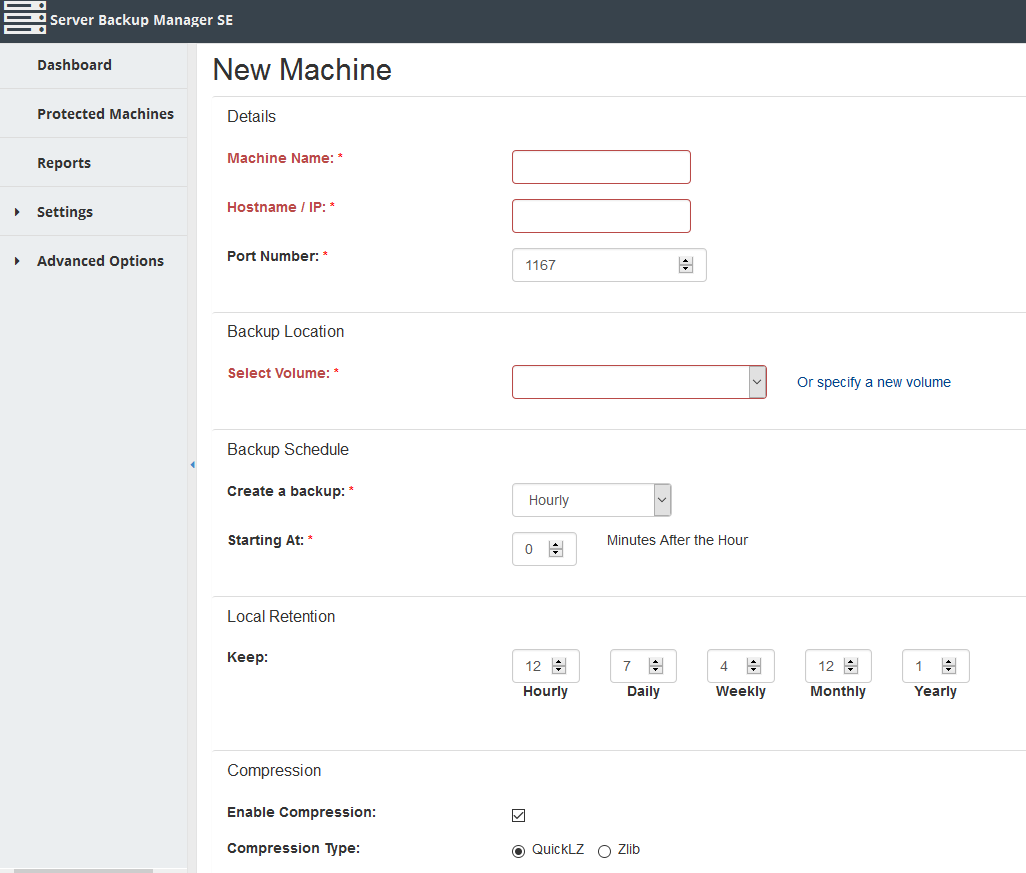
8) On the new page, enter the server information, specify a new volume, set the backup schedule, retention, and compression. Make sure that the Encryption and Deploy Agent Software items, just off screen in the image below, are unchecked. | 8) On the new page, enter the server information, specify a new volume, set the backup schedule, retention, and compression. Make sure that the Encryption and Deploy Agent Software items, just off screen in the image below, are unchecked. | ||
[[File: | [[File:new_machine2.png]] | ||
Latest revision as of 08:49, 20 March 2017
Requirements:
a) Enough disk space is available on the Backup server you want to use for the agent server
b) The agent server is using a 64-bit OS
c) The agent server is running the latest kernel
1) On the agent server, add the R1Soft repository and install the software:
curl http://www.ace-host.net/downloads/r1soft.repo >> /etc/yum.repos.d/r1soft.repo
yum -y install serverbackup-agent kernel-devel
chkconfig cdp-agent on
service cdp-agent start
2) Retrieve the key from the backup server, and get the latest backup module:
serverbackup-setup --get-key http://backup4.acenet.us
serverbackup-setup --get-module
3) Allow the backup server in the agent server's firewall
4) Generate a secure password from the monitor, and copy it to a notepad. You will need this to configure a MySQL instance on the Backup server
5) On the agent server, create a MySQL user with full privileges on the server. Use secure password you just copied down.
mysql
CREATE USER 'CDPBackup'@'localhost' IDENTIFIED BY 'PASSWORDGOESHERE';
GRANT ALL PRIVILEGES ON *.* TO 'CDPBackup'@'localhost';
FLUSH PRIVILEGES;
6) Log into the backup server, and determine which partition to back the Agent server to.
7) Go to Protected Machines, and on the next page, hit the New Machine Button
8) On the new page, enter the server information, specify a new volume, set the backup schedule, retention, and compression. Make sure that the Encryption and Deploy Agent Software items, just off screen in the image below, are unchecked.

