How do I flush my DNS cache: Difference between revisions
Docs admin (talk | contribs) No edit summary |
Docs admin (talk | contribs) |
||
| Line 4: | Line 4: | ||
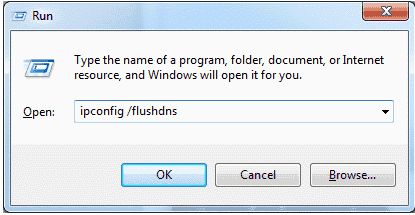
[1] Press Windows key and R at the same time to invoke Run window. | [1] Press Windows key and R at the same time to invoke Run window. | ||
[[File:windows10.jpg]] | |||
[2] Then, input ipconfig /flushdns in the empty box and click OK. (make sure there is a space before the slash) | [2] Then, input ipconfig /flushdns in the empty box and click OK. (make sure there is a space before the slash) | ||
Latest revision as of 15:43, 21 March 2020
How to flush your DNS cache depends on what OS (Operating System) your local machine is running. There are instructions below on how to flush your DNS cache for various operating systems.
Windows 10
[1] Press Windows key and R at the same time to invoke Run window.

[2] Then, input ipconfig /flushdns in the empty box and click OK. (make sure there is a space before the slash)
[3] A command box will flash on the screen for a split second and the DNS Resolver cache is cleared.
Windows XP
[1] Start -> Run
[2] Enter in "command" (no quotes)
[3] In the new window that pops up, enter "ipconfig /flushdns" (no quotes)
Windows Vista/Windows 7
[1] Click Start button.
[2] In the search box at the bottom of the menu, type "cmd" without the quotes.
[3] Hit the Enter button.
[4] In the new window that pops up, enter "ipconfig /flushdns" (no quotes)
Mac
[1] From your hard-drive, open the Applications folder, and click to open the Utilities folder.
[2] Double-click Terminal.
[3] OSX Leopard: Enter "dscacheutil -flushcache" (no quotes) OSX versions 10.5.1 and before: Enter "lookupd -flushcache" (no quotes)