Blacklist and Whitelist Management: Difference between revisions
Docs admin (talk | contribs) No edit summary |
Docs admin (talk | contribs) No edit summary |
||
| (3 intermediate revisions by the same user not shown) | |||
| Line 1: | Line 1: | ||
The instructions below detail how to blacklist and whitelist an EMAIL address through SpamAssassin. <br> | |||
<br> | |||
< | 1. Log in to your cPanel account.<br> | ||
< | http://yourdomain.com:2082/<br> | ||
<br> | |||
2. Under Email, click on Spam Filters.<br> | |||
<br> | |||
< | [[File:Email SpamFilters.png]]<br> | ||
<br> | |||
<br> | |||
3. Make sure that SpamAssassin is enabled by clicking the toggle next to "Process New Emails and Mark them as Spam" if it is not Blue.<br> | |||
<br> | |||
[[File:SpamAss on.png]]<br> | |||
<br> | |||
<br> | |||
4. Click on "Show Additional Configurations" under Additional Configurations.<br. | |||
<br> | |||
<br> | |||
[[File:Add Config.png]]<br> | |||
<br> | |||
<br> | |||
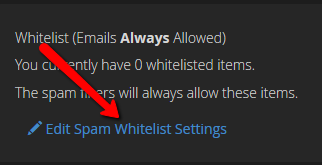
5. To Whitelist and email address, click on "Edit Spam Whitelist Settings".<br> | |||
<br> | |||
[[File:Whitelist.png]]<br> | |||
<br> | |||
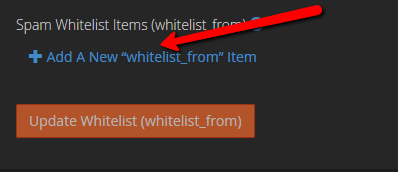
-Then click Add A New "whitelist_from" item.<br> | |||
<br> | |||
[[File:Add Whitelist.png]] | |||
<br> | |||
<br> | |||
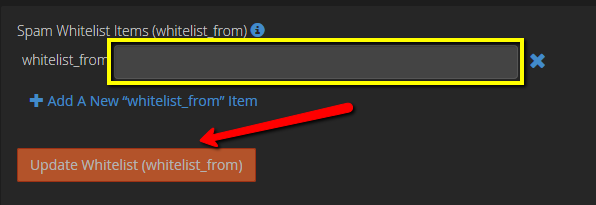
-Add the email address that you would like to whitelist and then click Update Whitelist.<br> | |||
<br> | |||
[[File:Whitelist email.png]]<br> | |||
<br> | |||
<br> | |||
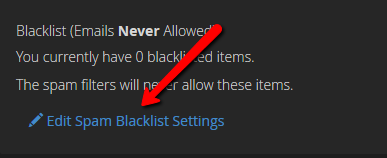
6. To Blacklist an Email account, follow Step 5 clicking on "Edit Spam Blacklist Settings" instead.<br> | |||
<br> | |||
[[File:Blacklist.png]] | |||
Latest revision as of 08:23, 30 May 2018
The instructions below detail how to blacklist and whitelist an EMAIL address through SpamAssassin.
1. Log in to your cPanel account.
http://yourdomain.com:2082/
2. Under Email, click on Spam Filters.

3. Make sure that SpamAssassin is enabled by clicking the toggle next to "Process New Emails and Mark them as Spam" if it is not Blue.

4. Click on "Show Additional Configurations" under Additional Configurations.<br.

5. To Whitelist and email address, click on "Edit Spam Whitelist Settings".

-Then click Add A New "whitelist_from" item.

-Add the email address that you would like to whitelist and then click Update Whitelist.

6. To Blacklist an Email account, follow Step 5 clicking on "Edit Spam Blacklist Settings" instead.
