Route Domain Email through Gmail: Difference between revisions
Docs admin (talk | contribs) No edit summary |
Docs admin (talk | contribs) No edit summary |
||
| (9 intermediate revisions by the same user not shown) | |||
| Line 13: | Line 13: | ||
[[File:gmail.png|800px]] | [[File:gmail.png|800px]] | ||
<br><br> | |||
Click on Save Changes before continuing. | |||
<br><br> | <br><br> | ||
| Line 21: | Line 23: | ||
'''1)''' Under Settings, choose the Accounts and Import tab on the horizontal toolbar. | '''1)''' Under Settings, choose the Accounts and Import tab on the horizontal toolbar. | ||
<br><br> | <br><br> | ||
'''2)''' Click on "Add another email | '''2)''' Click on "Add another email address" to add the email you want to be able to send from. | ||
<br><br> | <br><br> | ||
[[File:gmail2.png|800px]] | [[File:gmail2.png|800px]] | ||
| Line 40: | Line 42: | ||
== Use POP3 to pull email into Gmail== | == Use POP3 to pull email into Gmail== | ||
Similar to a desktop email client, Gmail can be configured to periodically connect to your non-Gmail account and pull | Similar to a desktop email client, Gmail can be configured to periodically connect to your non-Gmail account and pull any new email it finds there. | ||
'''1)''' Under Settings, choose the Accounts and Import tab on the horizontal toolbar. | '''1)''' Under Settings, choose the Accounts and Import tab on the horizontal toolbar. | ||
<br><br> | <br><br> | ||
'''2)''' To the right of “Check mail from other accounts | '''2)''' To the right of “Check mail from other accounts:”, click on 'Add a mail account" | ||
<br><br> | <br><br> | ||
[[File:gmail7.png|1000px]] | [[File:gmail7.png|1000px]] | ||
| Line 75: | Line 77: | ||
When picking up email using POP3, Gmail doesn’t quite work that way. | When picking up email using POP3, Gmail doesn’t quite work that way. | ||
<br><br> | <br><br> | ||
Gmail will check for new mail on its own schedule, which is not configurable. | Gmail will check for new mail on its own schedule, which is not configurable. It is dynamically based on how much email you receive. The more email you get, the more often Gmail checks for new email. But that’s not documented anywhere, and could be subject to change. | ||
<br><br> | <br><br> | ||
The Refresh button above your inbox '''''may''''' cause Gmail to check for new mail at your remote non-Google POP3 account. | The Refresh button above your inbox '''''may''''' cause Gmail to check for new mail at your remote non-Google POP3 account. Some email providers also limit how often you can check for new email this way, and may return an error. | ||
<br><br> | <br><br> | ||
== Configure email client to send through Gmail== | == Configure email client to send through Gmail== | ||
Since you are sending domain mail through Gmail, this is a case where your email address and your email account will be two different things. | Since you are sending domain mail through Gmail, this is a case where your email address and your email account will be two different things. The next steps are to configure your desktop program to send and receive email from your personal email address (your equivalent to [email protected]), but to do so requires connecting to the servers associated with your Gmail account. | ||
<br><br> | <br><br> | ||
In your email client, such as Outlook or Thunderbird, create a new email account with your email address, but choose '''Manual Setup''' to enter the correct information. | |||
<br><br> | <br><br> | ||
* Your name: The name that will be used as the display name on the From: line of email you send. | * '''Your name:''' The name that will be used as the display name on the From: line of email you send. | ||
* Email Address: The email address that will be used on the From: line of email you send. In our examples, we’d use [email protected], but you would use whatever non-Google email address you’ve been setting this up for. | * '''Email Address:''' The email address that will be used on the From: line of email you send. In our examples, we’d use [email protected], but you would use whatever non-Google email address you’ve been setting this up for. | ||
* Account Type: POP3 | * '''Account Type:''' POP3 | ||
* Incoming mail server: pop.gmail.com | * '''Incoming mail server:''' pop.gmail.com | ||
* Outgoing mail server: smtp.gmail.com | * '''Outgoing mail server:''' smtp.gmail.com | ||
* User Name: Your Gmail user name – typically your Gmail email address. This is important: even though you’re not using your Gmail email address in your correspondence, it’s still the identifier that allows you to login to your Gmail account to access the email collected there. | * '''User Name:''' Your Gmail user name – typically your Gmail email address. This is important: even though you’re not using your Gmail email address in your correspondence, it’s still the identifier that allows you to login to your Gmail account to access the email collected there. | ||
* Password: The password to your Gmail account. | * '''Password:''' The password to your Gmail account. | ||
<br> | <br> | ||
Additional settings specified by Google include: | Additional settings specified by Google include: | ||
| Line 99: | Line 101: | ||
* The connection to the SMTP server should use either SSL on port 465, or TLS/STARTTLS on port 587. | * The connection to the SMTP server should use either SSL on port 465, or TLS/STARTTLS on port 587. | ||
* The connection to the SMTP server requires basic authentication.<br> | * The connection to the SMTP server requires basic authentication.<br> | ||
These settings are often in an “Advanced” or “More Settings | These settings are often in an “Advanced” or “More Settings" section in the account configuration in your email program. | ||
<br><br> | <br><br> | ||
Once successfully configured, you can send and receive email on your own private non-Google email address, using | Once successfully configured, you can send and receive email on your own private non-Google email address, using Gmail.<br> | ||
Latest revision as of 11:03, 30 May 2018
Forwarding Email to a Gmail account is not recommended, as any spam you received is forwarded on and appears as coming from your email address. This will cause mail filters to block your email address instead of the original sender.
The correct way to get your domain email through Gmail is to have Gmail PULL the email from your domain email address.
Enable POP and IMAP Access in Gmail
1) Login to your Gmail account.
2) In the upper right, you will see a Gear Icon. Click it, and in the dropdown click "Settings".
3) On the next page, click the "Forwarding and POP/IMAP" tab on the horizontal toolbar.
4) Enable POP, either for all mail, or for all mail from now on (your first download will include only mail that arrives after you make this change). Choose what you’d like to do with email on Gmail after you’ve downloaded it. Acenet recommends “archive Gmail’s copy”, as it allows you to use the Gmail interface to review all of your email, even if not at your computer. That is handy when using a mobile device such as a smartphone.
5) Acenet recommends that you enable IMAP as well. This is most useful when you might access your Gmail account from multiple locations – perhaps multiple PCs, mobile devices, and the Gmail web interface. IMAP access allows you to keep them all in sync.
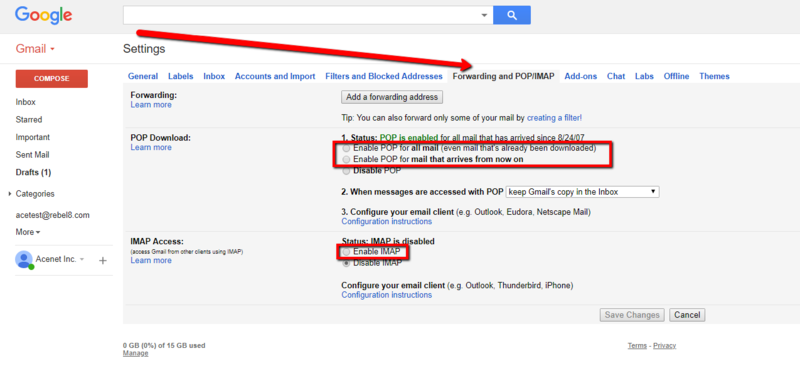
Click on Save Changes before continuing.
Configure "Send Mail As" to send email through Gmail
It is possible to respond to your domain email via the Gmail website, thanks to SMTP.
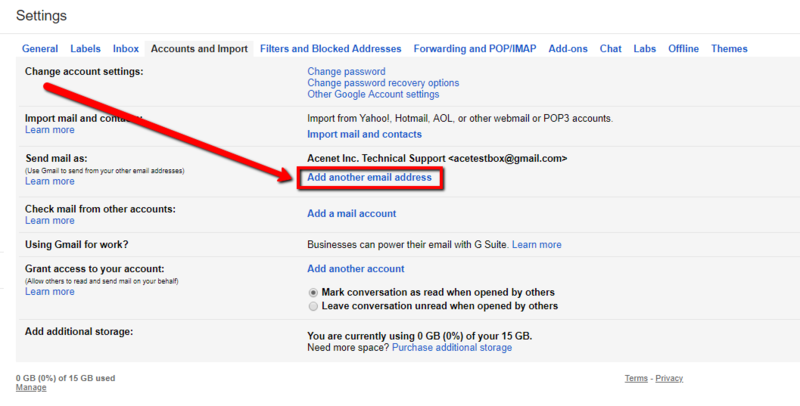
1) Under Settings, choose the Accounts and Import tab on the horizontal toolbar.
2) Click on "Add another email address" to add the email you want to be able to send from.
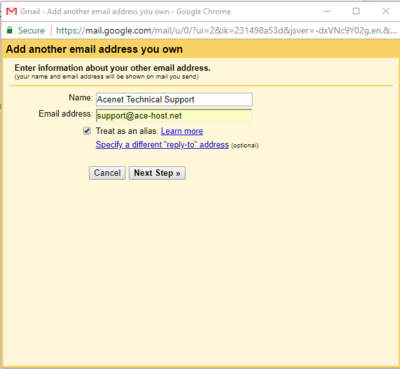
3) The “From:” address of email consists of two parts: the display name, and an email address. Enter those for the address you’ll be sending from, and click Next Step.
4) Enter the SMTP information given by the provider of your non-Google email address. For example, the SMTP configuration for domain hosted at Acenet.
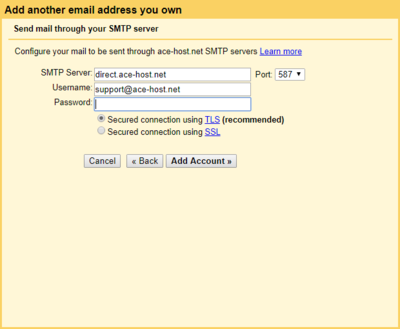
When sending email “as” your other email address, Google actually sends it through that email provider’s service rather than sending directly. There are several reasons for this, but the most practical is that, according to email standards, if Google sends it directly, many email recipients will display the Google email address as sending “on behalf of” the non-Google email address, which can confuse them. Sending through the other service’s server side-steps this issue.
Once you’ve set up the ability to send email from Gmail through your non-Google email address, make sure the correct address is the default. This is the address your email will appear to come “From:” when you compose a new mail in Gmail.
Use POP3 to pull email into Gmail
Similar to a desktop email client, Gmail can be configured to periodically connect to your non-Gmail account and pull any new email it finds there.
1) Under Settings, choose the Accounts and Import tab on the horizontal toolbar.
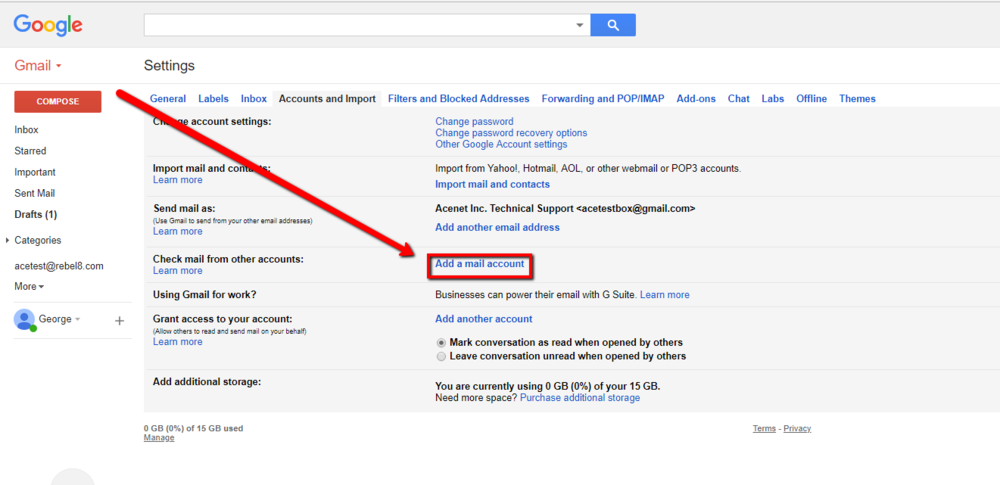
2) To the right of “Check mail from other accounts:”, click on 'Add a mail account"
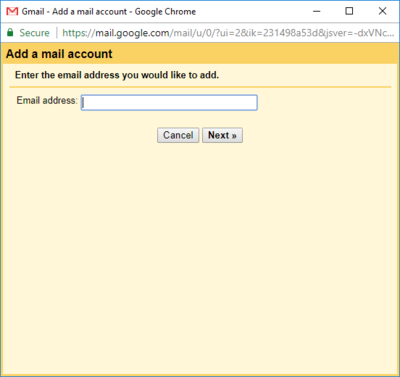
3) Enter the email address you wish to pull mail from.
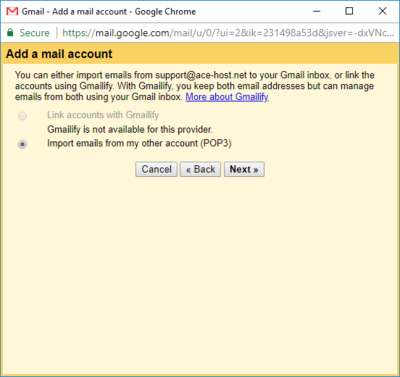
4) On the next page, Import email from my other account (POP3) should be automatically selected. Click Next.
5)Enter the POP3 information from the provider of your non-Google email address.
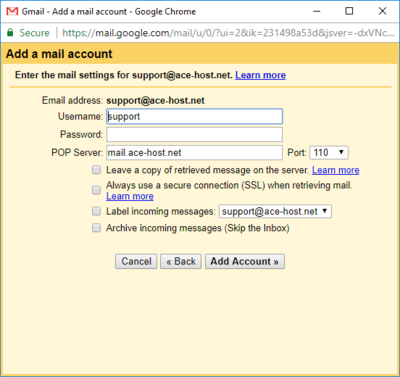
There are several options as well:
- Leave a copy of retrieved messages on the server. This typically need not be set; in fact, if your service provider has space limitations, you probably don’t want it to be set. On the other hand, it can provide a nice backup of your email, since your messages will be stored in two places: on your non-Google email service and on Gmail.
- Always use a secure connection (SSL) when retrieving mail. If your provider supports SSL connections, as most do, there’s no harm in setting this, as it prevents intermediaries from being able to see your unencrypted email. On the other hand, since the connection is server-to-server, the chances of that happening are much lower, so the need for an SSL connection isn’t as great.
- Label incoming messages: This is purely personal preference. Particularly if you access mail from several different accounts, this is a quick and easy way to see which account a message is associated with.
- Archive incoming messages (Skip the Inbox). When using Gmail as your primary interface for email, you don’t want this. You want your incoming email to appear in your Inbox normally.
Click Add Account when done.
How often does POP3 pick up?
When you use a traditional desktop email program like Microsoft Office Outlook or Thunderbird, you can configure that program to check for new email on a schedule – say every 15 minutes or so. Alternatively, you can hit a “Send/Receive” button or similar command to have the program check for new mail right away.
When picking up email using POP3, Gmail doesn’t quite work that way.
Gmail will check for new mail on its own schedule, which is not configurable. It is dynamically based on how much email you receive. The more email you get, the more often Gmail checks for new email. But that’s not documented anywhere, and could be subject to change.
The Refresh button above your inbox may cause Gmail to check for new mail at your remote non-Google POP3 account. Some email providers also limit how often you can check for new email this way, and may return an error.
Configure email client to send through Gmail
Since you are sending domain mail through Gmail, this is a case where your email address and your email account will be two different things. The next steps are to configure your desktop program to send and receive email from your personal email address (your equivalent to [email protected]), but to do so requires connecting to the servers associated with your Gmail account.
In your email client, such as Outlook or Thunderbird, create a new email account with your email address, but choose Manual Setup to enter the correct information.
- Your name: The name that will be used as the display name on the From: line of email you send.
- Email Address: The email address that will be used on the From: line of email you send. In our examples, we’d use [email protected], but you would use whatever non-Google email address you’ve been setting this up for.
- Account Type: POP3
- Incoming mail server: pop.gmail.com
- Outgoing mail server: smtp.gmail.com
- User Name: Your Gmail user name – typically your Gmail email address. This is important: even though you’re not using your Gmail email address in your correspondence, it’s still the identifier that allows you to login to your Gmail account to access the email collected there.
- Password: The password to your Gmail account.
Additional settings specified by Google include:
- The connection to the POP3 server should use SSL on port 995.
- The connection to the SMTP server should use either SSL on port 465, or TLS/STARTTLS on port 587.
- The connection to the SMTP server requires basic authentication.
These settings are often in an “Advanced” or “More Settings" section in the account configuration in your email program.
Once successfully configured, you can send and receive email on your own private non-Google email address, using Gmail.